Demystifying the Django MVT (Model, Views, Templates) ecosystem


Django is a free and open-source high-level Python web development framework. A “batteries included”, comprehensive and versatile framework with plenty of features and functionality straight out of the box. Django, packed with enormous and fantastic documentation encourages rapid development with clean, pragmatic code design. It is very popular among web developers because of its loosely coupled MVT architecture and ease of use, however, it can be hard to learn.
By: Andy Ndem February 17, 2023.
Objectives:
Freshers to building web applications with Python/Django tech stack often find it overwhelming while trying to know the intricacies of how Django web framework delivers a data driven application from the back-end data sources to the front-end browser. Fortunately, the Django framework provides developers with the means to perform the task, but it takes more than just a walk in the park to understand the process. The goal of this blog post is to help newbies on their coding journey to disperse the cloudy relationship patterns between:
Django models
Django views and urls
Django templates
I believe this will level their learning curve and inspire them to learn more.
Prerequisites:
* Prior working knowledge of Django and Python
* Basic Django
* Basic Python
* Basic HTML
* Basic Javascript
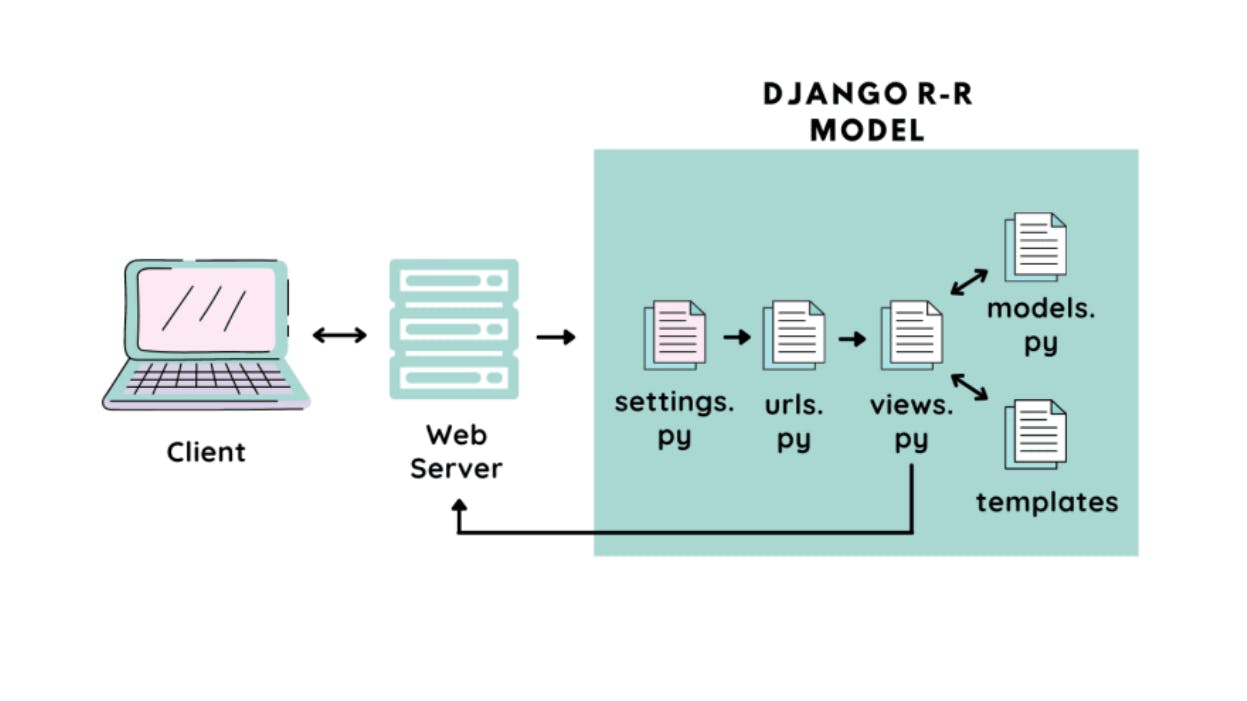
Figure 1: Django Request - Response Model
Django Request - Response Model:
When a visitor visits a Django page, as illustrated in figure 1 above...
The web browser requests a page by its URL, for example, domain.com/posts/5. The web server receives the HTTP request and passes it over to Django. Django runs through each URL pattern defined in the urlpatterns configuration. The framework checks each pattern against the given URL path, in order of appearance, and stops at the first one that matches the requested URL. In this case, the pattern /posts/<id>/ matches the path /posts/5/.
Django imports the view of the matching URL pattern and executes it, passing an instance of the HttpRequest class and the keyword or positional arguments. The view uses the models to retrieve information from the database. Using the Django Object Relational Mapper (ORM), QuerySets of database complex data types are translated into python native data type SQL and executed in the database. The view then uses the render() function to return a response object and render an HTML template passing the Post object as a context variable. The rendered content is returned as a HttpResponse object by the view with the front-end understandable data types like JSON or text/html content type by default.
Breaking down the entire process:
1. Create a view in the views.py file in “my_app” folder
2. Create a urls.py file in “my_app” and map the view here i.e. ‘my_app/urls.py’
3. Open the urls.py file in “mysite” project folder and map the URL file of “my_app” here i.e. ‘mysite/urls.py’
Note: The above procedure ensures all requests to “my_app” in the project urls.py will be directed to the urls.py in “my_app” folder. Do NOT get confused between the two urls.py files as one belongs to “my_app” and the other belongs to the project “mysite”.
Django models:
A model is the single, definitive source of information about your data. It contains the essential fields and behaviors of the data to be stored in the database. Generally, each model maps to a single database table. Each model is a Python class that sub-classes django.db.models.Model. Each attribute of the model represents a database field.
Django provides an automatically-generated database-access API; Models organize Django application’s central concepts to help make them flexible, robust, and easy to work with. If used wisely, models are a powerful way to collate data into a definitive source of truth. Django provides some built-in model types for the convenience of implementing basic authentication, including the User and Permission models. A model that reflects a certain concept can be created by inheriting from a parent Model class. As in the example below...
from django.db import models
from django.template.defaultfilters import slugify
from django.contrib.auth.models import User
from django.urls import reverse

class Post(models.Model):
    title = models.CharField(max_length=255)
    slug = models.SlugField(unique=True, max_length=255)
    content = models.TextField()
    created_on = models.DateTimeField(auto_now_add=True)
    author = models.TextField()

    def get_absolute_url(self):
        return reverse('blog_post_detail', args=[self.slug])

    def save(self, args, *kwargs):
        if not self.slug:
            self.slug = slugify(self.title)
        super(Post, self).save(*args, **kwargs)

    class Meta:
        ordering = ['-created_on']

        def str(self):
            return self.title


class Comment(models.Model):
    author_name = models.CharField(max_length=42)
    email = models.EmailField(max_length=75)
    website = models.URLField(max_length=200, null=True, blank=True)
    content = models.TextField()
    post = models.ForeignKey(Post, on_delete=models.CASCADE)
    created_on = models.DateTimeField(auto_now_add=True)
The above example shows how to create the Post, and Comment models and how they relate to themselves through by one-to-many relationship in the database. It means that one author with author_name can create many posts. If the author is deleted all associated posts will be automatically deleted.
The slugify was imported for generating slugs from strings, Django’s User for authentication, and reverse from django.urls to give us greater flexibility with creating URLs.
The functionality for the generation of the URL and the function for saving the post was added. This is crucial because it creates a unique link to match our unique post.
The logic for ordering the posts was added to a nested inner Meta class. The Meta class generally contains other important model logic that isn’t related to database field definition.
When you create a custom model in Django, you subclass Django’s Model class and take advantage of all its power. Each model you create generally maps to a database table. Each attribute is a database field. This gives you the ability to create objects to work with that humans can better understand.
You can make a model useful to you by defining its fields. Many built-in field types are conveniently provided. These help Django figure out the data type, the HTML widget to use when rendering a form, and form validation requirements. If you need to, you can write custom model fields.
Database relationships can be defined using a ForeignKey field (many-to-one), or a ManyToManyField (give you three guesses). If those don’t suffice, there is also a OneToOneField.
Together, these allow you to define relations between your models with levels of complexity limited only by your imagination.
Django Views:
Django views are Python functions that takes http requests and returns http response, like HTML documents. The Django view represents the business logic layer in the Django MVT architecture design pattern. A web page that uses Django may contain many views with different tasks and missions. Views are usually put in a file called views.py located on your app's folder.
To create a view, we need to write a function in the views.py file inside of the application folder. The function name can be anything but should be a sensible name as far as its usability is concerned. Let's take a basic example of sending an HTTP response of "Hello World".
project_name/app_name/views.py
from django.http import HttpResponse

def index(request):
    return HttpResponse("Hello World")
Yes, we are simply returning an HTTP Response right now, but rendering Templates/HTML.
Django URLs:
URLs are the front doors to your web applications in Django. A URL is a path through which a specific web-based application and one particular page in that web application can be reached. A request in Django first comes to urls.py and then goes to the matching function in views.py. Python functions in views.py take the web request from urls.py and give the web response to templates. It may go to the data access layer in models.py as per the queryset. Urls use regular expressions to capture URL patterns for processing.
Mapping the Views to URLs:
We need to first create a urls.py file in the application folder to create a map of the URL to be mapped with the view. After creating the file in the same app folder as the views.py, import the function in the view into the file.
project_name/app_name/urls.py
from .views import index
from django.urls import path

urlpatterns = [
    path('', index, name="index"),
]
The path can be anything you like but for simplicity, we'll keep it blank('') for now, representing the root url. Now, you have the path for your view to work but it's not linked to the main project. We need to link the app urls to the project urls. To link the urls of your app to the main project folder, you need to add just a single line of code in the urls.py file of the project folder. Let’s see the example below....
from django.contrib import admin
from django.urls import path, include

urlpatterns = [
    path('admin/', admin.site.urls),
    path('', include('post.urls')),
]
You need to add the line path('', include('post.urls')), and also import the include function from django.urls. This additional statement includes the urls or all the urlpatterns in the post app from the urls.py file into the project's URL-routes. Here, the URL path can be anything like 'home/', 'about/', 'posts/', etc. but since we are just understanding the basics, we'll keep it i.e. the root URL. You can also see that there is another route in our project 'admin/' which is a path to the administration panel provided by Django. Now if you start the server and visit the default URL i.e http://127.0.0.1:8000, you will see a simple HTTP message “Hello World”.
Breaking down the path function in urlpatterns variable
The path function in the urlpatterns takes in at least 2 parameters, i.e. the URL path and the related view function.
path( ' ', view_name, name=”url_name” )
^ ^ ^
| | |
| | url_name
| function_name
url_path
url_path
The URL Path is the pattern or literally the path which you use in the Browser's search bar. This can be static i.e. some hard-coded text like home/, user/, post/home/, etc. and we can also have dynamic URLs like post/<int:pk>/, user/<str:name>/, etc. here the characters <int:pk> and <str:name> will be replaced by the actual id(integer/primary key) or the name(String) itself as defined in the database through models.py. The url_path ‘ ‘ represents the root url.
function_name
The view or the function is the name of the function that will be attached to that URL path. That means once the user visits that URL, the function is literally called. View is just a fancy word for a function(or any logic basically). There are two types of views, function and class-based views, and how to use them for various use cases can only be learned along the way because views is a topic where the crust of Django exists.
We'll learn to create different implementations and structure our views, for time-being just consider them as the unit where every operation on the web can be performed. We can create other standalone functions in python to work with the views to make it a bit structured and readable.
url_name
This is an optional parameter to the path function as we do not mandatorily need to give the URL map a name. This can be really useful in multi-page application websites where you need to link one page to another and that becomes a lot useful in the Django Templating Language.
Templates:
Templates allow us to render some more relevant pieces of data rather than simple text HTTP responses as we did earlier. We can even re-use certain components of a template in other using the Django Templating Language. So by using HTML templates, we can write a complete web page. The Django Templating Language is Django's way of making templates more dynamic and easy to write dynamic web applications. It is basically a language which allows defining placeholders that should later be replaced for the purpose of implementing designs. A template is a simple text-based file format like XML, CSV, HTML, etc. A template contains variables {{%var%}} that get replaced with values when the template is evaluated and tags
{% logic %} that controls the logic of the template. In Django, Templates are quite an important component for the application as it acts as the presentation layer in the Django MVT architecture design pattern. With the help of templates and some features provided by Django, it becomes very intuitive and simple to create dynamic web contents. So, templates are simply a html document or kind of a wire-frame for content to be displayed for the web app.
Creating Templates
To create a Template, we can write a simple HTML document like the below....
Create a folder templates in the base folder, inside the templates folder, create a file index.html as templates/index.html
This is a simple HTML template, with the <h1> tags. As Django is a framework, there is a standard for storing all the templates for the project and application. There are a couple of standard options: - One of which is creating a templates folder in the root folder, or to modify the project_name/settings.py file.
Inside the settings.py file, we need to locate the TEMPLATES section and modify as below.....
import os  / (from pathlib import Path....Django 3.2 upwards)

TEMPLATES = [
    {
        'BACKEND': 'django.template.backends.django.DjangoTemplates',
        'DIRS': [os.path.join(BASE_DIR, 'templates'),],
        'APP_DIRS': True,
        'OPTIONS': {
            'context_processors': [
                'django.template.context_processors.debug',
                'django.template.context_processors.request',                        'django.contrib.auth.context_processors.auth',                      'django.contrib.messages.context_processors.messages',
            ],
        },
    },
]
In this snippet, we have changed the DIRS option to search the templates in the folder templates in the root directory. We can also create the templates folder in each application instead of a single folder in the project root.
Rendering Templates:
After creating a template and making the required settings to make sure Django is able to pick up those templates, we need to work with views and URLs to actually render those templates. This is a simple HTML template, with the <h1> tags. As Django is a framework, there is a standard for storing all the templates for the project and application.
We can use the render function from django.shortcuts to simply render a template. But we will create a Python function or a View to actually render the template. So, we'll create a View-URL map as we created in the previous part .
Let us create a view function in the post/views.py file, more generally (app_name/views.py file). Firstly, we need to import the render function from django.shortcuts and then return the function call of render.
from django.shortcuts import render

def home(request):
    return render(request,'index.html')
And in the URLs, we'll create a different pattern like for e.g. 'home/'
from django.urls import path
from post import views

urlpatterns = [
    path('home/', views.home, name="home"),
]
Variables
This is the most common use case for the Django Templating Language/Engine as we can use the variables from the back-end and inject it in the template. We can parse the variable into the template by the syntax : {{ variable_name }}. To show its use cases, we can declare a variable in a view and then parse it in the Template. Though it is not dynamic right now we can later on fetch values from the database and store them in the form of variables in our views, as shown in figure 2 below...

Figure 2.
As we can see, we were able to load the variable into the template using the Django Templating Engine. A template file contains variables {{ var }} that are replaced with values when the template is evaluated and tags
{% logic %} that control the logic of the template.
Conditional statement
We can also use conditional statements in a Template using a very simple syntax to perform conditional rendering. We can use the
{% if condition %} to display certain special kinds of blocks in the Template. We need to end the block using the syntax {% endif %}.
So, from this part of the series, we were able to understand the concept of Templates in Django. Generally, variables, loops, conditional statements, and template inheriting can be used in a Django application. In the future series, we will investigate about static files, caching, security, optimizations, as well as deployment to cloud based platform using Heroku.
Happy coding!
Conclusion:
This article was aimed at taking readers from knowing very little about the relationships between Django Models, Views, URLs and Templates to the level of clearing the doubts about how the MVT architecture of the rather highly opinionated Django web framework is implemented. I, personally struggled in my early days and therefore the real reason for this article. I hope that I was successful.
About the Author: Andy Ndem is an experienced Software Developer with skills in Python, Django, Rest API, React JS, Javascript, CSS, HTML, GIT, and with a passion for Technical Writing and Open Source contributing.
Portfolio: https://github.com/andyndem
Linkedin: https://www.linkedin.com/in/andy-ndem-71492975
Twitter: @AndyNdem
Email: andyndem@gmail.com